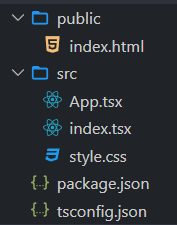
In React gli elementi di un modulo web funzionano in modo leggermente diverso dagli altri elementi del DOM, in questo articolo vedremo come esempio un modulo web per effettuare il login costituito da due campi uno per inserire l'indirizzo e-mail, e l'altro per inserire la password, inoltre si presuppone che si abbia almeno un' applicazione React con i requisiti minimi di default così composta

Cominciamo con creare un nuovo componente Form.tsx che sarà il nostro modulo web di login
src/Form.tsx
import * as React from 'react';

class Form extends React.Component<any, any> {
  constructor(props) {
    super(props);
    this.state = { email: '', password: '' };
  }

  onChangeEmail = (e: { target: { value: any } }) => {
    this.setState({ email: e.target.value });
  };

  onChangePassword = (e: { target: { value: any } }) => {
    this.setState({ password: e.target.value });
  };

  sendForm = (event) => {
    event.preventDefault();
    const data = new FormData(event.target);
    for (let [key, value] of data.entries()) {
      console.log(key, value);
    }
  };

  render() {
    return (
      <div>
        <h2>React Form Login Example</h2>
        <form onSubmit={this.sendForm}>
          <label>Email:</label>
          <br />
          <input
            type="email"
            name="email"
            value={this.state.email}
            onChange={this.onChangeEmail}
            placeholder="Enter Email Address"
            required
          />
          <br />
          <br />
          <label>Password:</label>
          <br />
          <input
            type="password"
            name="password"
            value={this.state.password}
            onChange={this.onChangePassword}
            placeholder="Enter Password"
            required
          />
          <br />
          <br />
          <input type="submit" value="Submit" />
        </form>
      </div>
    );
  }
}

export default Form;
abbiamo aggiunto al componente lo stato e definito due proprietà email e password
//src/Form.tsx
...............
...............

constructor(props) {
    super(props);
    this.state = { email: '', password: '' };
  }
usiamo queste due proprietà per assegnare ad ogni elemento del modulo un valore di default tramite la sintassi
//src/Form.tsx
...............
...............
<input type="email"
...............
...............
value={this.state.email}
/>
...............
...............
<input type="password"
...............
...............
value={this.state.password}
/>
inoltre ad ogni campo deve essere assegnato un attributo onChange con riferimento ad un'apposita funzione che ci permetta di cambiare lo stato dell'elemento del modulo web come nell'esempio del componente Form.tsx
//src/Form.tsx
...............
...............

 onChangeEmail = (e: { target: { value: any } }) => {
    this.setState({ email: e.target.value });
  };

  onChangePassword = (e: { target: { value: any } }) => {
    this.setState({ password: e.target.value });
  };


...............
...............

<input
   type="email"
   ...............
   onChange={this.onChangeEmail}
   ...............
   />

...............
...............

<input
   type="password"
   ...............
   onChange={this.onChangePassword}
   ...............
   />
poichè in caso contrario potremmo ricevere un warning simile a questo
Warning: You provided a `value` prop to a form field without an `onChange` handler. This will render a read-only field. If the field should be mutable use `defaultValue`. Otherwise, set either `onChange` or `readOnly`.
    at input
    at form
    at div
    at Form (/~/src/Form.tsx:30:9)
    at div
    at App
e non ci sarà possibile impostare un valore a gli elementi del modulo, infine la funzione sendForm che verrà invocata tramite l'attributo onSubmit ci permetterà di acquisire i dati dal modulo web, in questo esempio saranno visibili nella console
//src/Form.tsx
...............
...............

sendForm = (event) => {
    event.preventDefault();
    const data = new FormData(event.target);
    for (let [key, value] of data.entries()) {
      console.log(key, value);
    }
  };

...............
...............

<form onSubmit={this.sendForm}>

...............
...............

</form>